SSH Certificates
By way of a Single Sign-on (SSO), the Akeyless Platform connects an SSH client to the server, using your chosen Authentication Methods, while using existing Access Groups and Policies in your environment.
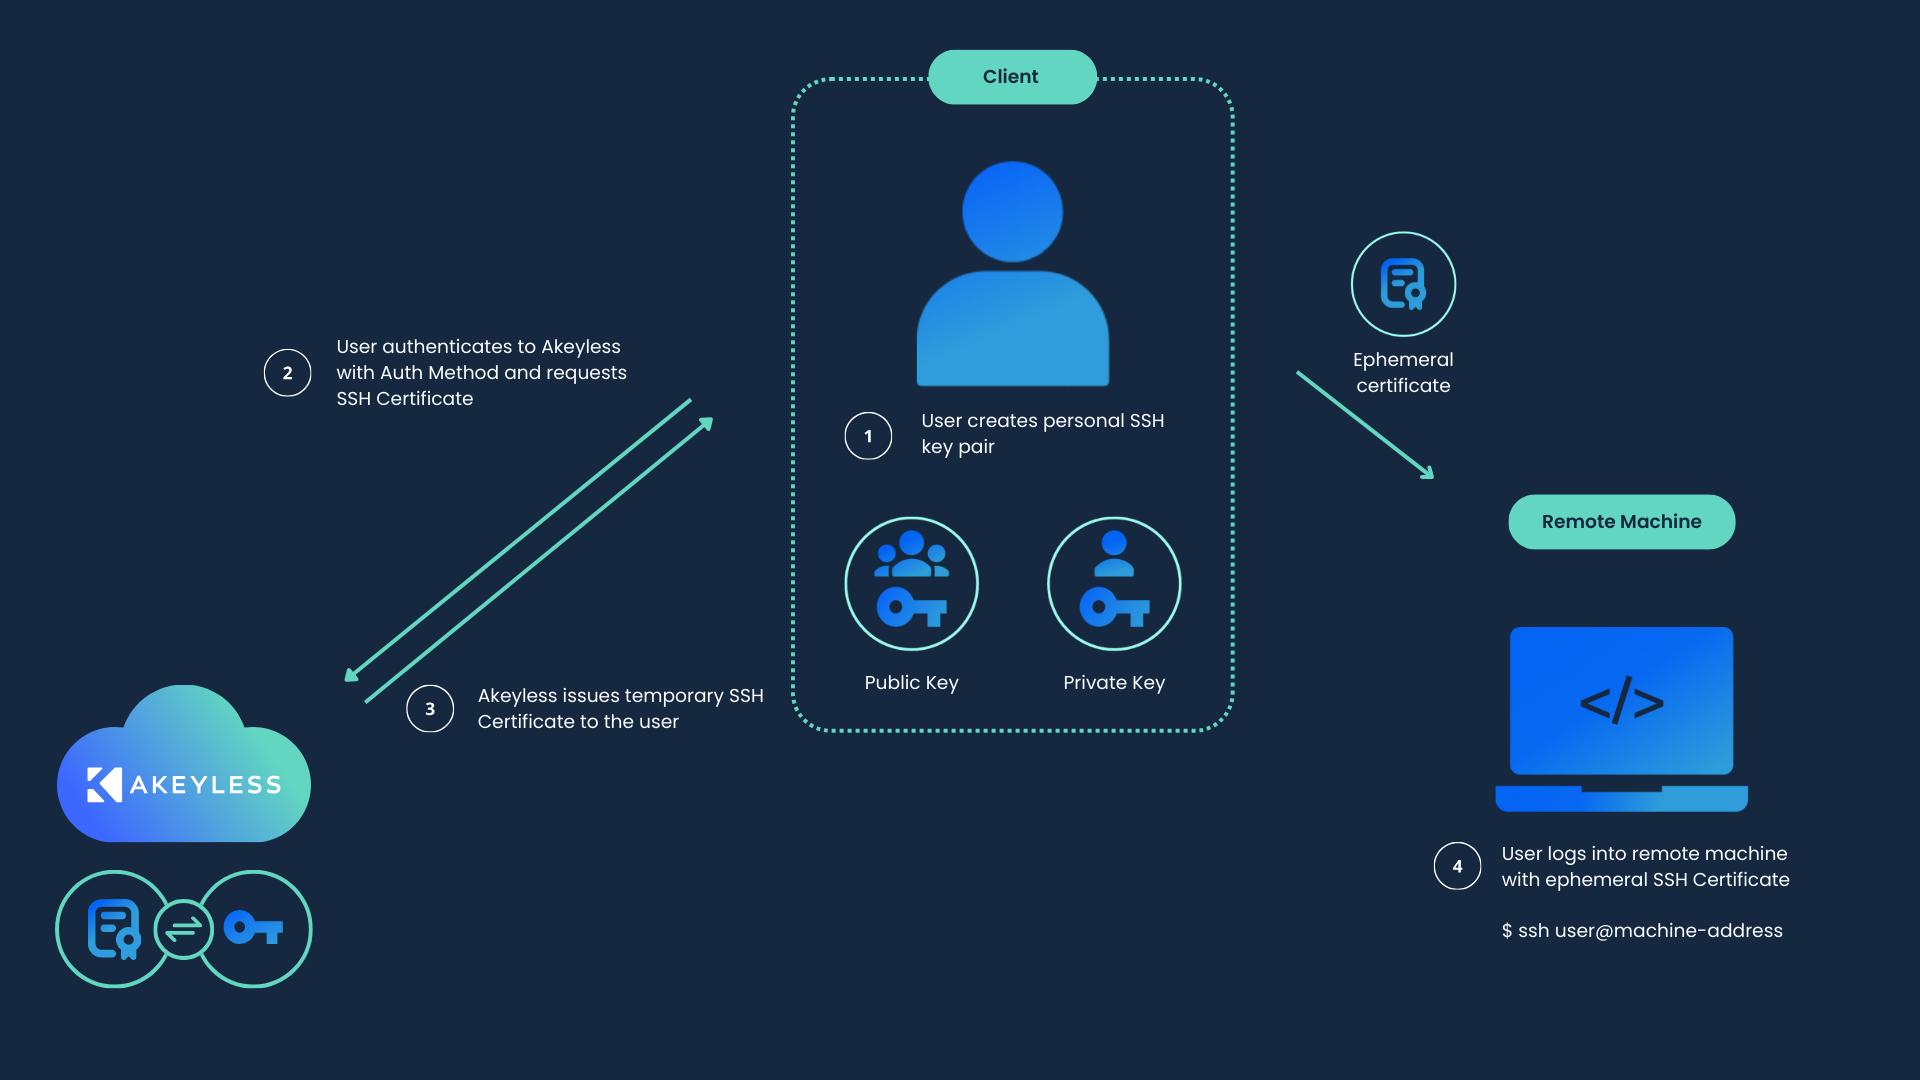
Instead of issuing a public and private SSH key pair, Akeyless provides temporary SSH certificates to allow access over the standard SSH protocol while eliminating the need for public SSH keys on the server side.
You can define several SSH Certificate Authorities (CAs). Each CA can sign your SSH public keys, with additional parameters like expiration date, principals, extensions, and so on.
You can sign the certificate with your own private key or generate a new one in the Akeyless Platform.
Note (Usage):We put the SSH Certificates section in the Secure Remote Access section of the docs because it is an integral part of setting up remote access SSH sessions. However, this feature can still be used for basic SSH logins without the need for a public SSH key on the target server even outside of the remote access use case.
For SRA entitlement and requester allowlist policy controls, see Allowed Access IDs and SRA Entitlements.
Configuration
To configure a CA, you will need an RSA key to match. You can either use an existing key or create a new one. Once you are logged in to your Akeyless account on the desired server, proceed to one of the following.
Uploading an Existing Key
If you want to use an existing key, upload your CA (RSA private key) for signing the client SSH certificate using the following command:
akeyless upload-rsa --name /keys/signer/MyRSA --alg RSA2048 --rsa-key-file-path Path-to-RSA.pemThe command will upload an existing key to the /keys/signer/ directory.
Creating a New Key
Alternatively, you can create a new RSA key in /keys/new-signer/ folder:
akeyless create-dfc-key --name /keys/new-signer/MyRSA --alg RSA2048The command above generates a new RSA key and stores it in the /keys/new-signer/ directory.
After you have the desired key on the server, display your key using the following command:
akeyless get-rsa-public --name /path/to/MyRSAThe output should look like this:
- RAW: MIIBIjANBgkqhkiG9w0BAQEFAAOCOA89zd/GgaPmzisJ3PMqYy3cPvRJc7VWRu72wR9muOdHX3vP7bscR+fGgKuOn1XPXBPjsOmo
- SSH: ssh-rsa AAAAB3NzaC1yc2EAAAADAQABAAABAQMpAMLn3TyairCPzfIqG4wUJFTWCemKV5Z0blvxzUuZnkWUHRdSnowxXyANqQcZ
- PEM: -----BEGIN RSA PUBLIC KEY-----
MIIBIjANBgkqhkiG9w0BAQEFAAOCAQ8w0BAQEFAAOCAQAQdfIsN7oV4BZdlj9PT8
xi+XdAcQeElmSEgetlQ3INYfdUzOEwroj4RlscYhKPeF730gtlQ3INYfdUzOEwro
WgAaZ+XdAcQeElmSEgetlQ3INYfdUzOEwroj4RlscYhKPeF730gkVv502+LCLeC3
53jXHt2ZYUnUzJUt1Bhnm33Sa/YYUl5ZSxru1f10D2FCYi2njsQoMgxxoN9GYDdp
53jYUnUvYUnUnm33Sa/uY31iXrMKQcP6QJ2IauY31iXrMKQcP6QJ2IauY31iXrMK
l4BfQzeHV23YLvCLDRVB5YxXHogQ00IDGjYFPbp3KuYVqIZiDcTdmQ0HsHE28bQe
-----END RSA PUBLIC KEY-----
Configuring the Server
To enable certificate authentication, you will need to configure the target server to trust any certificates signed by your CA's public key as follows:
-
Fetch the CA's public key from your Akeyless account by way of the following command:
akeyless get-rsa-public --name /path/to/MyRSAThe output should contain three sections, one in a raw format, the second in an SSH format, and the third in a
PEMkey format, similar to the example in the previous section. -
Copy the Public Key with the SSH format from step 1 (starting from
ssh-rsa…and ending before- PEM) to a file in the desired folder on the SSH server (for example/etc/ssh/ca.pub), then to a new file on the target server that will be accepting SSH connections.Example of retrieving the SSH value and putting it into the
/etc/ssh/ca.pubfileakeyless get-rsa-public --name /path/to/MyRSA --json --jq-expression='.ssh' > /etc/ssh/ca.pubssh-rsa AAAAB3NzaC1yc2EAAAA... -
Add the following lines to
/etc/ssh/sshd_configon the target server. Once done, thesshdservice must be restarted.TrustedUserCAKeys /etc/ssh/ca.pub -
If your server's SSH version is over 8.2, you will also have to add the following line to the same file. It can be either before or after the line from step 3, but in the same section at the end of the file.
PubkeyAcceptedKeyTypes=+ssh-rsa,[email protected]
Principals
An advanced feature available for server configuration in OpenSSH 6.2 and later is the use of the AuthorizedPrincipalsFile. This configuration option specifies a file that enumerates the valid principals (identities) permitted for certificate-based authentication.
In SSH terminology, a "principal" is a designated named entity, serving as an auxiliary form of identification, especially during certificate-based authentication processes. An SSH key certificate can be associated with one or multiple principals, akin to roles or usernames. The AuthorizedPrincipalsFile aims to determine which of these principals are granted login privileges.
The procedure is as follows:
-
During the authentication phase, an SSH client submits a certificate to the server.
-
The server assesses the certificate's legitimacy, examining factors such as its trusted authority signature and expiration status.
-
If deemed valid, the server juxtaposes the certificate's principals with the allowed principals delineated in the
AuthorizedPrincipalsFile. -
Authentication is successful if there's a match between one of the certificate's principals and an entry in the
AuthorizedPrincipalsFile. Otherwise, the authentication is denied.
The structure of the AuthorizedPrincipalsFile is simple. Each line within the file stands for a valid principal, with the provision for comments (lines that commence with #).
For instance:
principal1
principal2
adminAuthorizedPrincipalsFile /etc/ssh/principalsGenerating a Certificate - CLI
Creating the Certificate Authority
The following command will create a new SSH Cert Issuer in the Akeyless Platform with ancillary data.
-
name: The name that will be assigned to the new Cert Issuer -
signer-key-name: The private key to be used for certificate signing -
allowed-users: Users allowed to use the certificate (supports wildcard) for explicitly provided list, or extracting the relevant username from an existing Sub-Claim -
ttl: The time (in seconds) to the expiration of the certificate -
principals: A specific set of SSH Certificate principals (optional) -
extensions: A specific set of SSH Certificate extensions (this parameter is also optional, if not stated the default extensions are: permit-X11-forwarding, permit-agent-forwarding, permit-port-forwarding, permit-pty, permit-user-rc)
akeyless create-ssh-cert-issuer --name /prod/ssh-cert-issuer --signer-key-name /path/to/MyRSA --allowed-users 'ubuntu,root' --ttl 300
Note (Akeyless Secure Remote Access):Starting with Gateway v4.45.0, Secure Remote Access (SRA) works out of the box with any SSH Cert Issuer where Secure Remote Access is enabled.
If you’re using an older Gateway version, make sure the SSH Cert Issuer
allowed_usersincludessession_*, so JIT (session) users are authorized. Also ensure Secure Remote Access is enabled on the SSH Cert Issuer.
ℹ️ Note (Connection Allowlist):When SRA is enabled on an SSH Cert Issuer, you can restrict which hosts users may connect to by using the
--secure-access-hostand--secure-access-enforce-hosts-restrictionflags. Starting with SRA v2.9.0,--secure-access-hostaccepts CIDR notation in addition to individual hostnames and IP addresses, for example:akeyless update-ssh-cert-issuer \ --name /prod/ssh-cert-issuer \ --secure-access-enforce-hosts-restriction true \ --secure-access-host 10.0.0.5 \ --secure-access-host 192.168.1.0/24
Issuing a Certificate
After setting up a key and a certificate issuer, the following command will generate a certificate signed by the CA.
-
cert-username: The username with which you intend to connect to the server, note to match it to theallowed-usersfrom the previous section. -
cert-issuer-name: The certificate issuer you configured using the previous section. -
public-key-file-path: The path to the file containing your SSH public key.
akeyless get-ssh-certificate --cert-username ubuntu --cert-issuer-name /prod/ssh-cert-issuer --public-key-file-path ~/.ssh/id_rsa.pub
Tip:The command
get-ssh-certificatereturns a certificate that is signed by the private CA key and uses the client’s public key that will be used to connect to the target server. The client's public key is not the same as the CA’s public key. It is a local public key that should be located in the command’s path together with the client’s private key. After you run the command, the signed certificate will be placed in the same path, so you can connect to the target server using the client’s private/public keys in that path.
The outcome of this command will be creating a new file beside the public key by adding a suffix to its name with -cert.pub, for example, ~/.ssh/id_rsa-cert.pub. This is a well-known convention that OpenSSH uses during authentication.
After generating a certificate, you should be able to connect to the server without a key, using a standard command:
ssh user@serverGenerating a Certificate - Console
Creating the Certificate Authority
This guide includes the steps needed for the necessary prerequisites. If you want to create the Certificate Issuer for an existing key, you may skip steps 1-3.
-
Log in to the Akeyless Console, and go to Items > New > Encryption Key>DFC.
-
Define a Name of the key, and specify the Location as a path to the virtual folder where you want to create the new key, using slash
/separators. If the folder does not exist, it will be created together with the key. -
Define the remaining parameters as follows:
-
Description: general description of the key (optional).
-
Tags: assign tags to the key (optional).
-
Delete Protection: When enabled, protects the secret from accidental deletion.
-
Type: The encryption algorithm used for the key.
-
Customer Fragment: If you have an existing customer fragment, you may attach it to the key. If you wish to generate one, please refer to these instructions.
-
-
Go to the folder in Akeyless where you saved the desired key, select it, and tap get public RSA key.
-
Copy the SSH format string (the top box starting with
ssh-rsa…, not the raw key) to a file on the desired folder on the SSH server, for example,/etc/ssh/ca.pub -
Go to Items > New > SSH Cert Issuer
-
Define a Name of the cert issuer, and specify the Location as a path to the virtual folder where you want to create it, using slash
/separators. If the folder does not exist, it will be created together with the cert issuer. -
Define the remaining parameters as follows:
-
Description: General description of the key (optional).
-
Tags: Assign tags to the key (optional).
-
Delete Protection: When enabled, protects the secret from accidental deletion.
-
Signer Key: The name of the linked key you defined in advance and used in steps 4-5.
-
Certificate Lifetime in Seconds: The time (in seconds) to the expiration of the certificate.
-
Allowed Users: Specify the allowed users for the certificates issued.
-
Principals: A specific set of SSH Certificate principals (optional)
-
You should now have a working certificate issuer.
Issuing a Certificate
To issue an SSH certificate using an existing CI through the console, go through the following steps:
-
Go to the folder in which your certificate issuer is located and select it.
-
Under the key details you will see a button reading Generate SSH Certificate, tap it.
-
Fill in the following details:
-
Certificate Username: The username that will be linked to the certificate. Make sure this username matches the allowed usernames you defined in the previous section.
-
Public Key: Your SSH public key, can be copied in or uploaded from file.
-
-
Tap generate, and if all parameters are valid, you will get a string representing your certificate. Download the certificate, or copy it to a file, in the client's
sshrelevant folder. -
After generating a certificate, you should be able to connect to the server without a key, just a standard
ssh user@servercommand.
Updated about 1 month ago