GitLab Plugin
GitLab is a web-based DevOps lifecycle tool that provides a Git-repository manager including a wiki, issue-tracking, and continuous integration and deployment pipeline features.
The Akeyless plugin for GitLab enables a secure, easy, and integrative way to fetch Secrets into GitLab pipelines.
Authentication
Each job has a JSON Web Token (JWT). In GitLab v15 and below, this is provided as a predefined CI/CD variable named CI_JOB_JWT_V2. In v16 and higher, predefined JWT variables are removed; instead, you declare your own ID tokens in the id_tokens: block with any variable name you choose.
When a pipeline is about to run, GitLab uses the job token and generates a unique token for it.
Note:GitLab v16 and higher -
CI_JOB_JWT_V2is replaced by ID tokens which are the JSON Web Tokens (JWTs) that can be added to a GitLab CI/CD job. For more details please find the relevant config file below.
The token is valid only while the pipeline job runs. After the job finishes, you can’t use the token anymore.
To work with the Akeyless GitLab plugin, we will use an OAuth 2.0 / JWT Authentication Method
OAuth 2.0 / JWT
In Akeyless Platform, create a new OAuth 2.0 / JWT Authentication Method with the following parameters:
akeyless create-auth-method-oauth2 --name /Dev/GitLabAuth \
--jwks-uri https://gitlab.com/oauth/discovery/keys \
--unique-identifier user_login \
--force-sub-claims
Where:
-
--jwks-uri- The URL to theJWKSthat contains the public keys that should be used for JWT verification. -
--unique-identifier- A unique claim name that contains details uniquely identifying the request. In the following example, we will use the GitLabuser_loginclaim. -
--force-sub-claims- Enforce Sub-Claims on role association.
Create a dedicated Access Role. Note that you will assign it the necessary permissions in a later stage of this guide:
akeyless create-role --name /Dev/GitLabRole Associate your new Role with the created Authentication Method, and assign it Sub Claims:
akeyless assoc-role-am --role-name /Dev/GitLabRole \
--am-name /Dev/GitLabAuth \
--sub-claims user_login=<YOUR GitLab USERNAME>
Warning:Sub Claims - It is mandatory to add an appropriate Sub Claim based on the claims available in the GitLab documentation to prevent access of unauthorized users.
Set Read and List permissions for Items:
akeyless set-role-rule --role-name /Dev/GitLabRole \
--path /Path/To/your/secret/'*' \
--capability read --capability list
Usage
Open your GitLab project and make sure you have a yaml file named .gitlab-ci.yml and update it to contain the following steps while making sure that the path to the relevant secrets, as well as the access-id value with your matching JWT access-id, was replaced.
Note:GitLab Versions and Tokens - GitLab v15 and above, supports
CI_JOB_JWT_V2, for older versions you can use the legacy environmentCI_JOB_JWTinstead.In GitLab v16 and above,
CI_JOB_JWT_V2is replaced by ID tokens.The image is
akeyless/ci_basewhich is a public Docker image based on Alpine Linux that contains the Akeyless CLI as well as other essential components.Token file initialization - The
akeyless/ci_basewrapper script (~/.akeyless/akeyless_env.sh) resolvesakeyless://-prefixed environment variables using one of two paths:
- Gateway path (when
AKEYLESS_API_GW_URLis set): the script reads the auth token from~/.akeyless/latest_token. Becauseakeyless authwrites the token to a shell variable but does not create this file automatically, you must initialize it manually —echo "$AKEYLESS_TOKEN" > ~/.akeyless/latest_token— before sourcing the script. This step is required in the v16 example below.- SaaS path (when
AKEYLESS_API_GW_URLis not set): the script falls back to the most recently used profile in~/.akeyless/profiles/. Nolatest_tokeninitialization is needed. This is the path used in the v15 example below.
variables:
  ACCESS_ID: <AccessID>

akeyless:
  image:
    name: akeyless/ci_base:latest-alpine
  before_script:
    - export MY_SECRET=akeyless://path/to/secret # Static / Dynamic secret
    - akeyless auth --access-id $ACCESS_ID --access-type jwt --jwt $CI_JOB_JWT_V2 > /dev/null
    # Script will replace any env var with prefix of "akeyless://" like above
    - source ~/.akeyless/akeyless_env.sh
  script:
    - echo "Fetching Secrets is Easy [$MY_SECRET]"
variables:
ACCESS_ID: <AccessID>
akeyless:
id_tokens:
FIRST_ID_TOKEN:
aud: https://gitlab.com
image:
name: akeyless/ci_base:latest-alpine
before_script:
- export AKEYLESS_API_GW_URL=https://Your-Akeyless-GW-URL:8000/api/v1
- export MY_SECRET=akeyless://gitlab/mySecret
# Initialize the token file required by the injection wrapper script (token is piped directly to avoid printing to stdout)
- akeyless auth --access-id $ACCESS_ID --access-type jwt --jwt $FIRST_ID_TOKEN --json --jq-expression='.token' > ~/.akeyless/latest_token
# Script will replace any env var with prefix of "akeyless://" like above
- source ~/.akeyless/akeyless_env.sh
script:
- echo "Fetching Secrets is Easy [$MY_SECRET]"Sample output of a successful job:
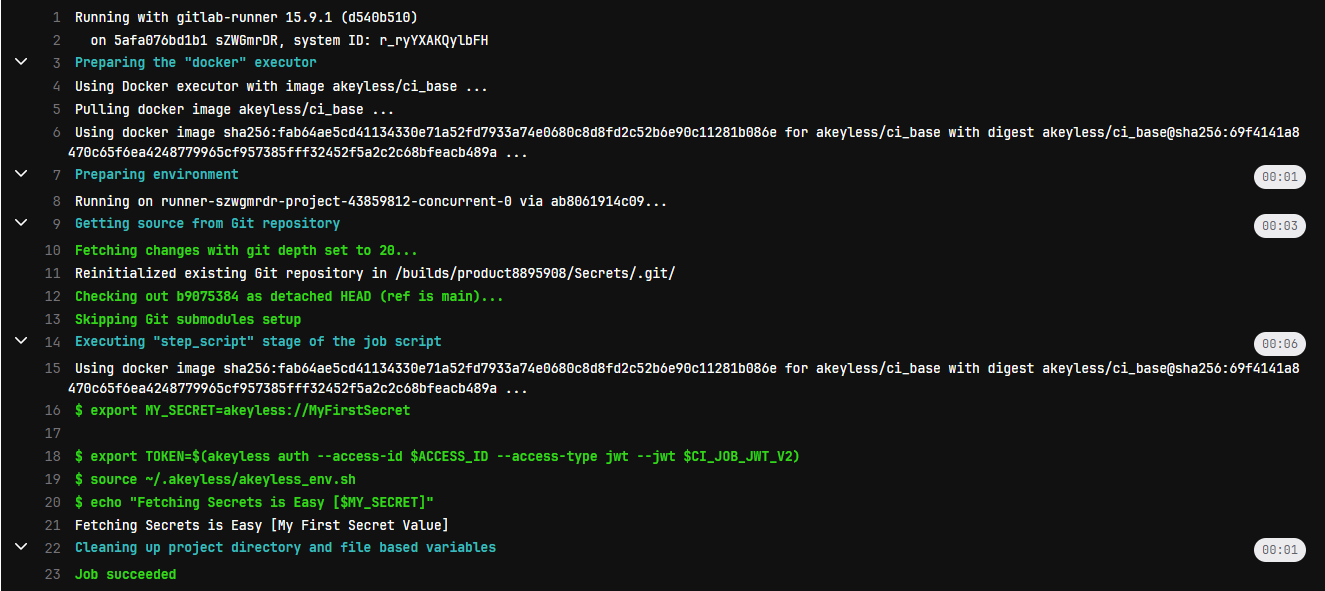
Success! - the secrets are accessible to use within the job logic (in this example, they are just being printed).
Tutorial
Check out our tutorial video on Managing Secrets in GitLab Pipelines.
Updated 3 months ago