Universal Identity
Universal Identity (UID)
Introduction
The Akeyless Universal Identity (UID) authentication method enables you to identify your machines without the need for an initial secret. This authentication method solves the secret zero problem by providing an inherited identity derived from the parent system together with a temporary token for continuous authentication.
The following diagram describes the flow of credentials when using UID tokens, demonstrating the elimination of the secret zero problem:
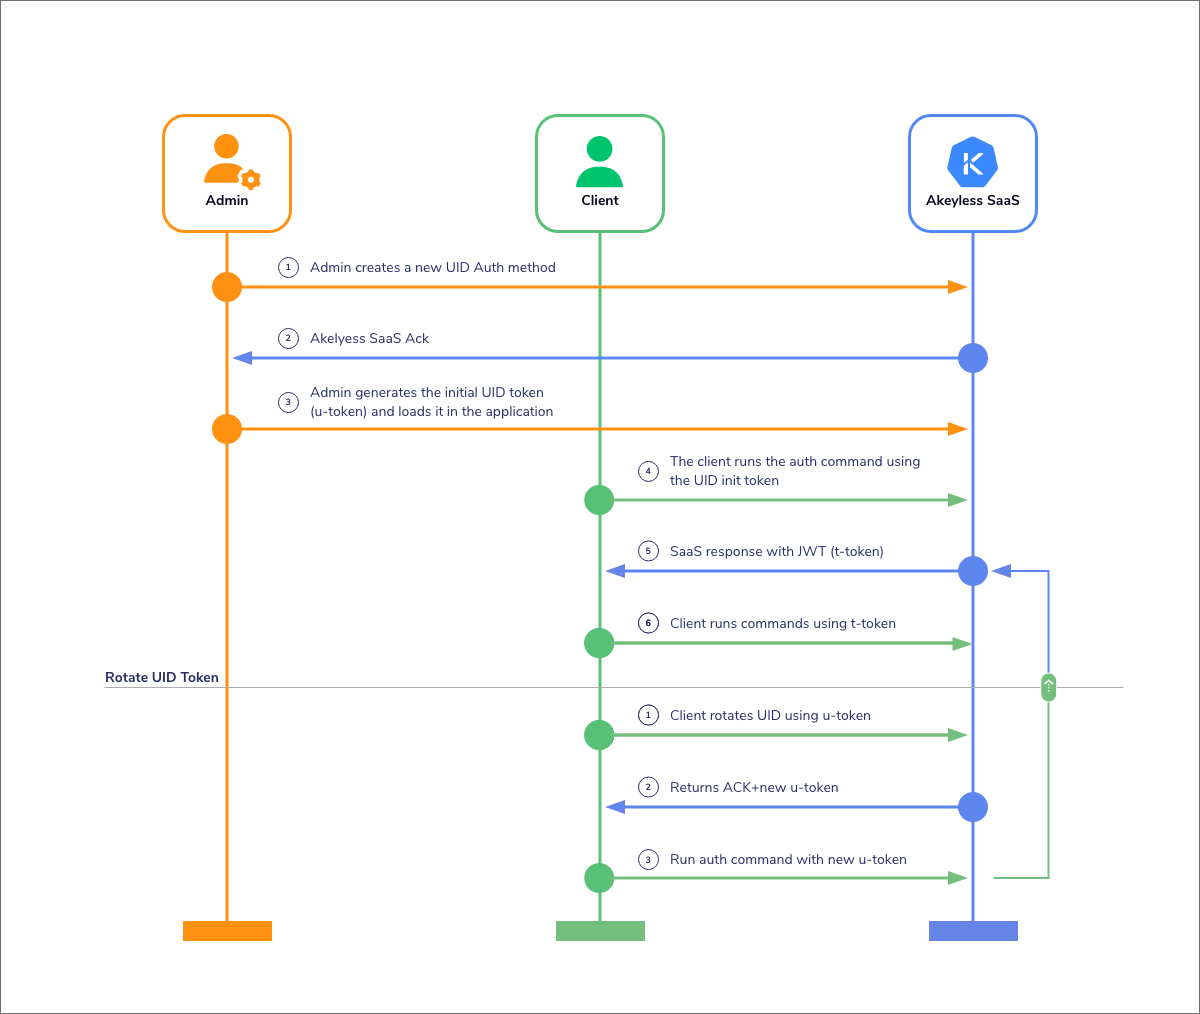
While the process has an initiation phase where the Admin creates the original authentication method, the secret zero problem is avoided by repeatedly rotating the UID, to the point where the original credentials are unusable, and constant rotation protects any vulnerability.
Create a Universal Identity Authentication Method with the CLI
Let's create a new Universal Identity authentication method using the Akeyless CLI. (You can also do this from the Akeyless Console.)
To create a new Universal Identity authentication method with the CLI, run the following command:
akeyless auth-method create universal-identity \
--name <UID Name>
Where:
-
name: A unique name for the authentication method. The name can include the path to the virtual folder where you want to create the new authentication method, using slash
/separators. If the folder does not exist, it will be created together with the authentication method. -
ttl: (Optional) The root token time-to-live in minutes. The TTL is renewed with every rotation. The default value is 60 minutes.
You can find the complete list of additional parameters for this command in the CLI Reference - Authentication section.
Generate a Token
The UID authentication functions by way of tokens that can be used to access the assigned permissions. To generate a new token, use the following command:
akeyless uid-generate-token --auth-method-name <UID Name>Using Universal Identity Tokens
To use a Universal Identity token, it must be associated with a Role.
To use it with the Akeyless CLI, add it to your Akeyless commands in one of the following ways:
akeyless list-items --uid-token u-XXXXXXXX
akeyless get-secret-value -n MyFirstSecret --uid-token u-XXXXXXXXcurl https://<Gateway-URL>:8080 -d "cmd=get-secret-value&name=MyFirstSecret&&uid-token=u-XXXXX"
curl https://<Gateway-URL>:8080 -d "cmd=list-items&&uid-token=u-XXXXX"Revoke a Token
To disable the permissions of a certain token, use the following command:
akeyless uid-revoke-token --revoke-token <u-XXXX> --revoke-type revokeSelf --auth-method-name <UID Name>You can find the complete list of additional parameters for this command in the CLI Reference - Authentication section.
Rotate a Token
Like with secrets and encryption keys, tokens can also be rotated. Once the token has been rotated its TTL will reset, but other than that the new version of the token retains all assigned functions and permissions.
To rotate a token use the following command:
akeyless uid-rotate-token --uid-token u-XXXXXXXXcurl https://<Gateway-URL>:8080 -d "cmd=uid-rotate-token&&uid-token=u-XXXXX"Rotation Flow
Frequent token rotation is a best practice. To automate UID token rotation, use the built-in uid-auto-rotate command set.
The command set includes:
init: Installs and initializes automatic rotation.rotate: Runs a manual rotation immediately.status: Shows the current auto-rotation status.uninstall: Removes the auto-rotation setup.
Example:
akeyless uid-auto-rotate init --uid-token u-XXXXXXXXFor command details and available flags, see CLI Reference - Universal Identity: uid-auto-rotate.
If custom automation is required, use uid-rotate-token in your own script.
If you wish to write your own script, here are some useful parts you might want to include:
To read a token from a file or to write a token to a file:
echo u-XXXXXXXX > /tmp/token
akeyless uid-rotate-token -i /tmp/token -o /tmp/token
To rotate a token with backward compatibility:
akeyless rotate-token --token u-XXXXXXXXcurl https://<Gateway-URL>:8080 -d "cmd=rotate-token&&token=u-XXXXX"Create a Child Token
Child tokens are not mandatory. They are optional and meant for users who want to use the token with a tree structure to control and monitor multiple services.
When using the following command:
akeyless uid-create-child-token --uid-token u-XXXXXXXXYou will get the following result with the child token:
"Child Token: u-XXXXXXXX2"You can find the complete list of additional parameters for this command in the CLI Reference - Authentication section.
Get the Token Tree
If you use child tokens and want to see the structure of your token tree, use the following command:
akeyless uid-list-children --uid-token u-XXXXXXXXakeyless uid-list-children --uid-token u-XXXXXXXX
Universal Identity Details:
{
"number_of_tokens": 2,
"max_depth": 1,
"root": {
"id": "ywzsub3u4tbu",
"comment": "root token",
"ttl": 1000,
"last_rotate": "2020-10-13 13:36:47 UTC",
"expired_date": "2020-10-14 06:16:47 UTC",
"children": {
"ywzsub3u4tbunVCo": {
"depth": 1,
"id": "ywzsub3u4tbunVCo",
"ttl": 1000,
"last_rotate": "2020-10-13 13:41:00 UTC",
"expired_date": "2020-10-14 06:21:00 UTC"
}
}
}
}Create a Universal Identity Authentication Method in the Console
-
Log in to the Akeyless Console and go to Users & Auth Methods > ⊕ New > Akeyless (Universal Identity).
-
Define a Name for the authentication method, and specify the Location as a path to the virtual folder where you want to create the new authentication method, using slash
/separators. If the folder does not exist, it will be created together with the authentication method. -
Define the remaining parameters as follows:
-
Expiration Date: Select the access expiration date. This parameter is optional. Leave it empty for access to continue without an expiration date.
-
Allowed Client IPs: Enter a comma-separated list of CIDR blocks from which the client can issue calls to the proxy. By "client," we mean cURL, SDK, and so on. This parameter is optional. Leave it empty for unrestricted access.
-
Allowed Trusted Gateway IPs: Enter a comma-separated list of CIDR blocks. When specified, the Gateway with the IP from this range will be trusted to forward original client IPs (so they will be visible in the logs).
If empty, the Gateway's IP will be used in the logs. -
Audit Log Sub Claims: Enter a comma-separated list of sub-claims keys to be included in the Audit Logs.
-
Allowed Client Type: Select the allowed client type that will be authorized to use this authentication method. For example,
CLI,Web UI,SDK. -
Check Deny Rotate if you want to forbid token rotation.
-
Check Deny Inheritance if you want to forbid creating child tokens.
-
TTL (minutes): Specify token TTL.
-
Tree Length: Set the number of child tokens that can be created.
-
Limit Child TTL: Set the limitation for the child tokens max TTL.
-
Notify when remaining Token TTL reaches: Set a notification that triggers when a token’s remaining lifetime reaches a defined percentage threshold. Supported only for tokens with a TTL of
10minutes or longer, and with thresholds of50%or higher.
-
-
Click Finish.
Generate a Token
To generate a token in the Console:
- Open the corresponding authentication method.
- Go to UID Tree tab and then click Generate.
Revoke a Token
To revoke a token in the Console:
- Open the corresponding authentication method.
- Go to UID Tree tab.
- Right-click the node and click Revoke token.
- Select Revoke self if you want to revoke the selected node only, or select Revoke self and children if you want to revoke the selected node and its child nodes.
- Click Save.
Create a Child Token
To create a child token in the Console:
-
Open the corresponding authentication method.
-
Go to UID Tree tab.
-
Right-click the root node and click Create child token.
-
Define the parameters as follows:
-
Check Deny Rotate if you want to forbid child token rotation.
-
Check Deny Inheritance if you want to forbid creating child tokens.
-
Child TTL (minutes): Specify child token TTL.
-
-
Click Save.
Get the Token Tree
To get the token tree in the Console:
- Open the corresponding authentication method.
- Go to UID Tree tab.
Note:When your Token Tree becomes complex, you can use your mouse to zoom in to see a specific token better, or zoom out to see the whole Token Tree.
Best Practices
A UID token is initially used to authenticate a client with Akeyless. The UID token includes essential authentication information, ensuring that the client's identity has been verified.
Once authenticated, the best practice is to exchange the UID token for a t-token (temporary token). The t-token is a short-lived token used for subsequent API requests. Using it for subsequent requests minimizes repeated authentication processes and reduces the opportunity for potential misuse.