AWS IAM
AWS Identity and Access Management (IAM)
This page discusses creating and using an AWS IAM-based authentication method in Akeyless.
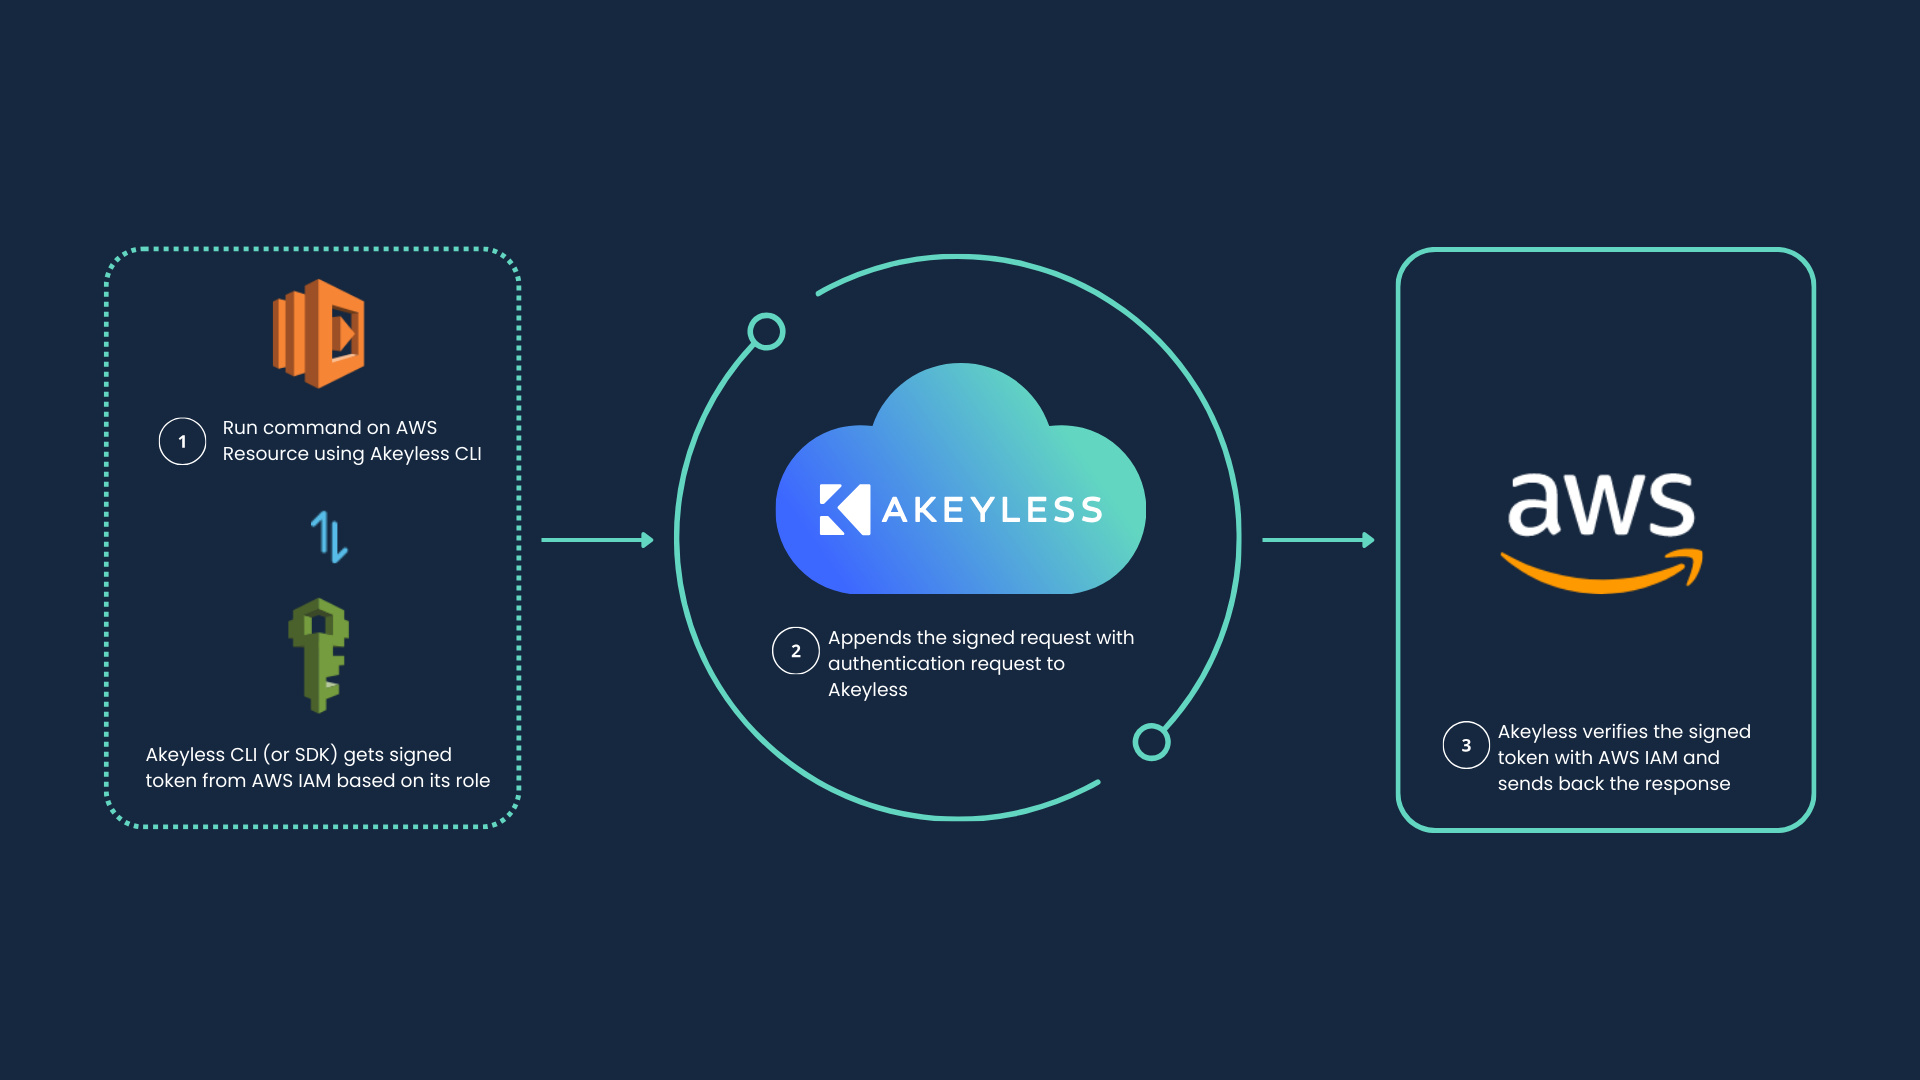
AWS IAM authentication provides an automated flow to retrieve an Akeyless token for IAM principals and AWS services or resources.
AWS IAM authentication is intended for workload authentication and is not recommended for direct interactive Console sign-in.
AWS Partition Support
For partition requirements, ARN partition examples, and STS endpoint guidance, see AWS Partition and Deployment Support.
AWS Deployment Pattern Support
For deployment pattern coverage and support status definitions, see AWS Partition and Deployment Support.
Creating an AWS IAM Authentication Method
This action is distinct from creating a new Akeyless account: it creates an additional AWS IAM-based authentication method for an existing account.
Required AWS IAM setting:
- Bounded AWS Account IDs: Configure one or more AWS account IDs that are allowed to authenticate by using this authentication method.
In the Console, enter values as a comma-separated list (for example,123456789012,210987654321).
With the CLI, repeat--bound-aws-account-idfor each value.
Creating an AWS IAM Authentication Method with the Console
To create a new AWS IAM-based authentication method with the Console:
- In the Console, under Administration, navigate to Users & Auth Methods.
- Select + New. This opens the Create Authentication Method form.
- On the Type selection screen, select AWS IAM, then Next →.
- Enter a name for the Authentication Method in the Name field. Optionally, include a path using
/separators to place the Authentication Method in a virtual folder, then select Next →. - Configure AWS IAM-specific fields as needed. For field details, see AWS IAM-Specific Optional Features, then select Finish.
Creating an AWS IAM Authentication Method with the CLI
To create an AWS IAM-based authentication method with the CLI:
akeyless auth-method create aws-iam \
  --name <AWS IAM Auth Method Name> \
  --bound-aws-account-id <AWS Account ID>
You can provide multiple AWS account IDs by repeating --bound-aws-account-id.
Read about more parameters available when creating an AWS IAM-based authentication method.
Using an AWS IAM Authentication Method
Using an AWS IAM Authentication Method with the CLI
To use an AWS IAM-based authentication method with a CLI profile, run the Akeyless configure command from an AWS resource (for example, Amazon EC2 instances or containers within an Amazon EKS cluster):
akeyless configure \
  --profile default \
  --access-id <Access ID> \
  --access-type aws_iam
To inspect the cloud identity token, run the Akeyless get-cloud-identity command:
akeyless get-cloud-identity \
  --cloud-provider aws_iam
To authenticate and retrieve a temporary Akeyless token, run the Akeyless auth command:
akeyless auth \
  --access-id <Access ID> \
  --access-type aws_iam
Note (Least Privilege):AWS IAM authentication does not require privileged AWS permissions. Attach a minimally privileged IAM role to the resource that authenticates to Akeyless (for example, an EC2 instance, ECS task, or EKS pod).
Associate with Access Roles
After creating the authentication method, associate it with one or more Access Roles so authenticated identities can perform actions in Akeyless.
- In the Console, under Administration, navigate to Users & Auth Methods.
- Select the AWS IAM authentication method.
- Add the required Access Roles.
- Save the changes.
For role configuration details, see Access Roles.
Update an Existing AWS IAM Authentication Method
AWS IAM authentication methods can require updates over time, for example when bounded account IDs, ARNs, or related constraints change.
To update in the Console:
- In the Console, under Administration, navigate to Users & Auth Methods.
- Select the AWS IAM authentication method to update.
- Update the required fields.
- Save the changes.
To update with the CLI, use the relevant akeyless auth-method update aws-iam flags in CLI Reference - Authentication.
Troubleshooting
If AWS IAM authentication fails, check the following:
- The workload is running with the expected IAM principal.
- The workload account matches configured bounded account IDs, ARNs, or other bounded fields.
- The configured Access ID and
aws_iamaccess type are correct. - For EC2-based flows, verify instance metadata service settings and hop limit requirements.
Optional Features
For optional features that apply across Authentication Methods, see Common Optional Features.
AWS IAM-Specific Optional Features
- Bounded ARNs: Enter one or more full IAM role or user ARNs that are allowed to authenticate by using this method. In the Console, enter values as a comma-separated list. With the CLI, repeat
--bound-arnfor each value. Supports wildcard patterns such as*and?. - Bounded Role Names: Enter one or more IAM role names that are allowed to authenticate. In the Console, enter values as a comma-separated list. With the CLI, repeat
--bound-role-namefor each value. - Bounded Role IDs: Enter one or more IAM role IDs that are allowed to authenticate. In the Console, enter values as a comma-separated list. With the CLI, repeat
--bound-role-idfor each value. - Bounded User names: Enter one or more IAM user names that are allowed to authenticate. In the Console, enter values as a comma-separated list. With the CLI, repeat
--bound-user-namefor each value. - Custom STS Endpoint: Set a custom AWS STS endpoint URL if your environment requires a non-default endpoint. If not set, Akeyless uses
https://sts.amazonaws.com. For partition-specific requirements and examples (aws,aws-us-gov, andaws-cn), see AWS Partition and Deployment Support. - Unique Identifier: Set a sub-claim key used to uniquely identify authenticated IAM principals.
AWS Instance Metadata Service
By default, the Amazon EC2 Instance Metadata Service (IMDSv2) enforces a hop limit of 1. This means the metadata token used for cloud identity (for example, IAM role credentials) must be accessed directly from the EC2 instance that initiated the session.
If the Akeyless Gateway runs in a different network context (for example, inside a container), authentication with aws_iam may fail because of this hop limit.
To resolve this, increase the allowed number of network hops by changing the http-put-response-hop-limit parameter. You can do this by using the AWS CLI or AWS Management Console.
The following command increases the hop limit to 2:
aws ec2 modify-instance-metadata-options \
  --instance-id <instance-id> \
  --http-put-response-hop-limit 2
This allows the metadata token to be accessed from nested network environments, such as containers, while still preserving IMDSv2 security protections.
If changing the instance metadata service hop limit is not possible, configure the Gateway Helm chart to use static environment variables under globalConfig.env:
globalConfig:
  env:
    - name: CLUSTER_URL
      value: "https://gw.wz-aws.cs.akeyless.fans"
    - name: ADMIN_ACCESS_ID_TYPE
      value: "aws_iam"
Replace CLUSTER_URL with the Gateway URL for the relevant environment.
Tutorial
Check out our tutorial video on AWS IAM Authentication and Access.
Updated 2 months ago
What’s Next
Make sure to associate your new Authentication Method with an Access Role to grant the relevant permissions within Akeyless.